teste![]()


How to Install PostgreSQL Relational Databases on CentOS 7
The PostgreSQL relational database system is a powerful, scalable, and standards-compliant open-source database platform. This guide will help you install and configure PostgreSQL on your CentOS 7 Linode.

Before You Begin
- Familiarize yourself with our Getting Started guide and complete the steps for setting your Linode’s hostname and timezone.
- Complete the sections of our Securing Your Server guide to create a standard user account, harden SSH access and remove unnecessary network services.
- Update your system:
sudo yum update
NoteThis guide is written for a non-root user. Commands that require elevated privileges are prefixed with sudo. If you’re not familiar with the sudo command, visit the Users and Groups guide for more information.
Install PostgreSQL
In this section, we’ll cover two different methods for installing PostgreSQL. If you do not need the latest version, we recommend using the first method to install PostgreSQL from the CentOS repositories.
Unless otherwise noted, the instructions in subsequent sections of this guide will be compatible with versions installed by either method.
Install From the CentOS Repositories
- As of this writing, the CentOS 7 repositories ship with PostgreSQL version
9.2.15. To install from the CentOS repositories, simply run:sudo yum install postgresql-server postgresql-contrib - Initialize your Postgres database and start PostgreSQL:
sudo postgresql-setup initdb sudo systemctl start postgresql - Optional: Configure PostgreSQL to start on boot:
sudo systemctl enable postgresql
Install From the Postgres Repositories
Alternatively, you can install the latest version from the Postgres repositories. As of this publication, PostgreSQL 9.6.3 is the most recent version available for CentOS 7, but these steps can be applied to any RPM-based installation.
NoteWhen Postgres is installed using this method, the version number is included in its configuration directories. For example, /var/lib/pgsql becomes /var/lib/pgsql/9.6. This is also the case with systemd units; systemctl status postgresql becomes systemctl status postgresql-9.6.
- Select the version you wish to install from the Postgres Yum repositories. Locate the CentOS 7 link for your chosen version and download it to your Linode:
wget https://download.postgresql.org/pub/repos/yum/9.6/redhat/rhel-7-x86_64/pgdg-centos96-9.6-3.noarch.rpm - Install the RPM, as well as the EPEL repositories, which will be used to satisfy dependencies:
sudo yum install pgdg-centos96-9.6-3.noarch.rpm epel-release - Update Yum to apply your changes and install PostgreSQL. When installing Postgres manually, you will have to specify the version:
sudo yum update sudo yum install postgresql96-server postgresql96-contrib - Initialize your database and start PostgreSQL:
sudo /usr/pgsql-9.6/bin/postgresql96-setup initdb sudo systemctl start postgresql-9.6 - Optional: Configure PostgreSQL to start on boot:
sudo systemctl enable postgresql-9.6
Configure PostgreSQL
Secure the Postgres Users
By default, PostgreSQL will create a Linux user named postgres to access the database software.
CautionThe postgres user should not be used for other purposes (e.g., connecting to other networks). Doing so presents a serious risk to the security of your databases.
- Change the
postgresuser’s Linux password:sudo passwd postgres - Issue the following commands to set a password for the
postgresdatabase user. Be sure to replacenewpasswordwith a strong password and keep it in a secure place.su - postgres psql -d template1 -c "ALTER USER postgres WITH PASSWORD 'newpassword';"Note that this user is distinct from thepostgresLinux user. The Linux user is used to access the database, and the PostgreSQL user is used to perform administrative tasks on the databases.The password set in this step will be used to connect to the database via the network. Peer authentication will be used by default for local connections. See the Secure Local PostgreSQL Access section for information about changing this setting.
Access the PostgreSQL Shell
The PostgreSQL client shell allows you to issue SQL commands to administer your databases. As the postgres Linux user, log in by running:
psql postgres
This will log you in as the postgres database user. You’ll see a prompt similar to this:
psql (9.2.15)
Type "help" for help.

postgres=#
In the last line, postgres=# indicates the name of the current database. To see a list of available commands, type \h. You may find more information on a specific command by adding it after \h. Once you’ve finished using the shell, you can exit with \q.
Work with Databases
This section will cover how to create, delete and access databases.
Create a Database
You can create databases with the createdb command. Create a sample database called mytestdb by running this command as the postgres Linux user:
createdb mytestdb
It’s also possible to assign ownership of the database to a specific Postgres user/role. For example, you could assign ownership to the examplerole role by running:
createdb mytestdb -O examplerole
The createdb command has several additional options, which can be found in the PostgreSQL documentation.
Connect to a Database
You can use the psql command to connect to a specific database.
- Connect to the test database:
psql mytestdb - You will see the following output:
psql (9.2.15) Type "help" for help. mytestdb=#By default, you will connect to a database as your peer-authenticated user. However, if you’ve enabled local password access, it’s also possible to specify which user you wish to connect as:psql mytestdb -U exampleroleYou’ll be prompted to enter the password for theexampleroledatabase user before you access the shell.
List Databases
From the Postgres shell, you can list all of your databases with the \l or \list command. You will receive output similar to this:
postgres=# \l
                          List of databases
Name    |  Owner   | Encoding |   Collate   |    Ctype    |   Access privileges
-----------+----------+----------+-------------+-------------+-----------------------
mytestdb  | postgres | UTF8     | en_US.UTF-8 | en_US.UTF-8 |
postgres  | postgres | UTF8     | en_US.UTF-8 | en_US.UTF-8 |
template0 | postgres | UTF8     | en_US.UTF-8 | en_US.UTF-8 | =c/postgres          +
|         |          |          |             | postgres=CTc/postgres
template1 | postgres | UTF8     | en_US.UTF-8 | en_US.UTF-8 | =c/postgres          +
|         |          |          |             | postgres=CTc/postgres
(4 rows)
You may also show the current database and user by entering \c from the Postgres shell. Additional info, like socket and port, will be included if you use \conninfo:
You are connected to database "mytestdb" as user "postgres" via socket in "/var/run/postgresql" at port "5432".
Delete a Database
You can delete, or drop, databases with the dropdb command. For example, to delete the mytestdb database created previously, issue this command as the postgres Linux user:
dropdb mytestdb
CautionDeleted databases cannot be recovered.
Work With Tables
PostgreSQL databases use tables to store and organize information within a database. In this section, you’ll find practical examples for adding, removing and manipulating tables. Unless otherwise noted, the commands in this section should be issued from the Postgres shell once you’ve connected to your database.
Create Tables
This section contains examples that create a test database with an employee’s first and last name, assigning each a unique key. When creating your own tables, you may specify as many parameters (columns) as you need and name them appropriately.
- Create a table called “employees” in your test database:
CREATE TABLE employees (employee_id int, first_name varchar, last_name varchar); - Insert a record into the table:
INSERT INTO employees VALUES (1, 'John', 'Doe');
View the Content of a Table
To view the contents of the “employees” table:
SELECT * FROM employees;
This produces the following output:
employee_id | first_name | last_name
-------------+------------+-----------
          1 | John       | Doe
(1 row)
List Tables in a Database
You can list all tables in the current database with the \dt command:
mytestdb-# \dt
          List of relations
Schema |   Name    | Type  |  Owner
--------+-----------+-------+----------
public | employees | table | postgres
Delete Tables
Delete tables with DROP TABLE. To delete the employees table:
DROP TABLE employees;
DROP TABLE accepts multiple comma-separated table names as arguments. For example, if you had two separate tables called employees1 and employees2, you could delete them both by running:
DROP TABLE employees1, employees2;
Add Columns
Tables can be altered to add definitions, data types and columns. In this example you’ll add a new start_date column that uses the date data type.
- Add the
start_datecolumn to theemployeestable:ALTER TABLE employees ADD start_date date; - Verify your change:
SELECT * FROM employees;You’ll see that the new column has been created, but it does not contain any data:employee_id | first_name | last_name | start_date -------------+------------+-----------+------------ 1 | John | Doe | (1 row)In this example you’ve used thedatedata type, but PostgreSQL tables support several different types of data. See the PostgreSQL Documentation for a full explanation of supported data types.
Add and Update Rows
In this section, you’ll use UPDATE to enter a value into the existing row you’ve created. Then, you’ll create an entirely new row with INSERT.
- Update the
start_datefield for the user with the value1in theemployee_idcolumn:UPDATE employees SET start_date = '2016-09-28' WHERE employee_id = '1'; - Create a new row in the
employeestable:INSERT INTO employees VALUES (2, 'Jane', 'Smith', '2015-03-09'); - Verify your changes:
SELECT * FROM employees;You’ll see that the start date of2016-09-28has been added to the first row, and that a new row has been created for “Jane Smith”:employee_id | first_name | last_name | start_date -------------+------------+-----------+------------ 1 | John | Doe | 2016-09-28 2 | Jane | Smith | 2015-03-09 (2 rows)
Remove Columns and Rows
In this section, you’ll remove a column from your table and then remove the second row.
- Use
ALTER TABLEto remove thestart_datecolumn you made previously:ALTER TABLE employees DROP start_date; - Now use
DELETEto remove the second row of youremployeestable. The following command will remove the row with a value of2in theemployee_idcolumn:DELETE FROM employees WHERE employee_id = '2'; - Confirm your changes:
SELECT * FROM employees;Your table now consists of a single row, with thestart_datecolumn removed:employee_id | first_name | last_name -------------+------------+----------- 1 | John | Doe (1 row)
Query a Table
You can use queries to pull specific information from your database. This command will query your employees table to only return values for the employee_id and last_name columns:
SELECT last_name,employee_id FROM employees;
You’ll receive an output similar to this:
last_name | employee_id
-----------+-------------
Doe       |           1
(1 row)
PostgreSQL supports many querying options. See the PostgreSQL Documentation for more information.
Work With Roles
PostgreSQL grants database access via roles, which are used to specify privileges. Roles can be understood as having a similar function to Linux “users.” In addition, roles may also be created as a set of other roles, similar to a Linux “group.” PostgreSQL roles apply globally, so you will not need to create the same role twice if you’d like to grant it access to more than one database on the same server.
Create Roles
New user roles are added with the createuser command. To create a new user called examplerole, issue this command as the postgres Linux user:
createuser examplerole --pwprompt
You will be prompted to create a password for the new user.
Give a Role Access to a Database
In this example, you’ll give the newly created examplerole user access to your database.
- Connect to the database:
psql mytestdbYou’ll be connected as thepostgresdatabase user by default. - From the PostgreSQL shell, enter the following to grant all privileges on the table
employeesto the userexamplerole:GRANT ALL ON employees TO examplerole; - Exit the database with
\q.
List All Roles
You can list all roles from the Postgres Shell by running \du. You’ll see an output similar to this:
postgres=# \du
                             List of roles
Role name   |                   Attributes                   | Member of
-------------+------------------------------------------------+-----------
examplerole |                                                | {}
postgres    | Superuser, Create role, Create DB, Replication | {}
Group Roles
For ease of administration, it’s possible to add multiple user roles to a single group, so that their privileges can be managed as a whole. In this section you’ll create a new group and add the examplerole user to it. These commands should be run as the postgres Linux user.
- Use the
createusercommand to create a new group role. The--no-loginoption is specified because groups do not need login capability.createuser examplegroup --no-login - Log into the Postgres shell and add
exampleroleto the new group:psql postgres GRANT examplegroup TO examplerole; - From the Postgres shell, verify your changes with
\du. You’ll see that theexampleroleuser is now listed as a member of theexamplegroupgroup:postgres=# \du List of roles Role name | Attributes | Member of --------------+------------------------------------------------+---------------- examplegroup | Cannot login | {} examplerole | | {examplegroup} group | | {} postgres | Superuser, Create role, Create DB, Replication | {}Thecreateusercommand has several other options. See the PostgreSQL documentation for more details. - When you’ve finished applying your changes, exit the Postgres shell with
\q.
Alter Roles
While specific settings and privileges can be applied to a role when it’s created, you can also modify a role’s properties later on. In this example, we’ll modify the examplerole user so that it can create new databases. The commands in this section should be run as the postgres Linux user.
- Log in as the
postgresdatabase user:psql postgres - From the Postgres shell, add the
CREATEDBparameter to theexampleroleuser:ALTER ROLE examplerole CREATEDB;A number of permissions can be applied when creating or altering a role. See the PostgreSQL Documentation for more details. - Use
\duto confirm your changes. You’ll see that the “Create DB” attribute is listed next to theexampleroleuser:postgres=# \du List of roles Role name | Attributes | Member of -------------+------------------------------------------------+----------- examplerole | Create DB | {} group | | {} postgres | Superuser, Create role, Create DB, Replication | {} - Once you’ve finished, exit the Postgres shell with
\q.
Delete Roles
The dropuser command is used to delete PostgreSQL roles. To delete the examplerole user, issue this command as the postgres Linux user:
dropuser examplerole
Peer Authentication
PostgreSQL uses peer authentication by default. This means that database connections will be granted to local system users if their Linux username matches the name of their PostgreSQL role. To make use of peer authentication effectively, you would need to create both a Linux user and a corresponding PostgreSQL role. For the examplerole role you just created, you can use peer authentication by creating an examplerole local system user. This command must be run as a user with sudo access:
sudo adduser examplerole && passwd examplerole
Note that you will be prompted to create a password for the new examplerole Linux user. Alternatively, you can follow our steps to secure local access.
Secure PostgreSQL
Secure Local Access
While PostgreSQL’s default peer authentication is useful in cases where a particular system user will be running a local program (e.g., scripts, CGI/FastCGI processes owned by separate users, etc.), you may wish to require passwords for greater security.
Commands in this section should be run as the postgres Linux user unless otherwise specified.
- Edit the
/var/lib/pgsql/data/pg_hba.conffile, under the# "local" is for Unix domain socket connections onlyheader:File: /var/lib/pgsql/data/pg_hba.conf1 2# "local" is for Unix domain socket connections only local all all peerReplacepeerwithmd5on this line to activate password authentication using an MD5 hash.NoteIf you installed PostgreSQL from the Postgres repositories, you will need to specify your version number in this file path, for example:/var/lib/pgsql/9.6/data/pg_hba.conf. - To enable these changes, you need to restart PostgreSQL. However, you did not grant the
postgresuser sudo privileges for security reasons. Return to the normal user shell:exit - Restart PostgreSQL and switch back to the
postgresuser:sudo systemctl restart postgresql su - postgres - As
postgres, connect to the test database as theexamplerolePostgreSQL user:psql mytestdb -U exampleroleYou will be prompted to enter the password for theexampleroleuser and then givenpsqlshell access to the database. When using a database, you may check access privileges for each of its tables with the\zcommand.
Secure Remote Access
PostgreSQL listens for connections on localhost by default, and it is not advised to reconfigure it to listen on public IP addresses. If you wish to make PostgreSQL externally accessible, it’s recommended that you follow the Postgres documentation for using SSL to secure your remote connections. Alternatively, you could connect to PostgreSQL over an SSH tunnel. To access your databases remotely using a graphical tool, please follow one of these guides:
Instalando e habilitando SSH no CentOS 7
Aqui vai um jeito bem fácil e rápido de instalar e habilitar o SSH no CentOS 7.
Para isso, nosso ponto de partida será uma imagem padrão do CentOS 7 e vamos seguir os seguintes passos:
- Instalar o SSH
- Habilitar as regras de firewall
- Testar 🙂
Instalar o SSH
Usando `yum`, basta seguir os seguintes comandos (você vai precisar executar o comando como root):
# yum update -y && yum install -y openssh openssh-server
Para verificar se tudo está funcionando:
$ systemctl status sshd
Se por algum motivo o serviço não foi corretamente configurado durante a instalação, podemos fazê-lo com:
# chkconfig sshd on# service sshd start
Configurações finas sobre o serviço do SSH podem ser encontradas em /etc/ssh/sshd_config.
Habilitar as regras de firewall
Normalmente esse processo de instalação habilita as configurações de ssh no serviço de firewall do CentOS 7 (firewalld)
Para verificar as configurações podemos:
# firewall-cmd --list-service | grep ssh
Se não houver configuração apropriada, podemos:
# firewall-cmd --add-service ssh# firewall-cmd --reload
Testar
Nesse ponto, já temos tudo certo para realizar o primeiro acesso.

Próximos passos
Esse mini tutorial mostra uma instalação simples destinada a ambientes de estudo e testes, sendo desaconselhável para ambientes produtivos.
Para ganhar um pouco de robustez e segurança você pode procurar sobre:
- Habilitar acesso SSH através de certificados
- Habilitar restrição de IP no firewall
How To Use Linux Screen
Introduction
Screen or GNU Screen is a terminal multiplexer. In other words, it means that you can start a screen session and then open any number of windows (virtual terminals) inside that session. Processes running in Screen will continue to run when their window is not visible even if you get disconnected.
Install Linux GNU Screen
The screen package is pre-installed on most Linux distros nowadays. You can check if it is installed on your system by typing:
screen --versionScreen version 4.06.02 (GNU) 23-Oct-17
If you don’t have screen installed on your system, you can easily install it using the package manager of your distro.
Install Linux Screen on Ubuntu and Debian
sudo apt updatesudo apt install screenCopyCopy
Install Linux Screen on CentOS and Fedora
sudo yum install screenStarting Linux Screen
To start a screen session, simply type screen in your console:
screenThis will open a screen session, create a new window, and start a shell in that window.
Now that you have opened a screen session, you can get a list of commands by typing:
Ctrl+a ?
Starting Named Session
Named sessions are useful when you run multiple screen sessions. To create a named session, run the screen command with the following arguments:
screen -S session_nameIt’s always a good idea to choose a descriptive session name.
Working with Linux Screen Windows
When you start a new screen session, it creates a single window with a shell in it.
You can have multiple windows inside a Screen session.
To create a new window with shell type Ctrl+a c, the first available number from the range 0...9 will be assigned to it.
Below are some most common commands for managing Linux Screen Windows:
Ctrl+acCreate a new window (with shell)Ctrl+a"List all windowCtrl+a0Switch to window 0 (by number )Ctrl+aARename the current windowCtrl+aSSplit current region horizontally into two regionsCtrl+a|Split current region vertically into two regionsCtrl+atabSwitch the input focus to the next regionCtrl+aCtrl+aToggle between the current and previous regionCtrl+aQClose all regions but the current oneCtrl+aXClose the current region
Detach from Linux Screen Session
You can detach from the screen session at any time by typing:
Ctrl+a d
The program running in the screen session will continue to run after you detach from the session.
Reattach to a Linux Screen
To resume your screen session use the following command:
screen -rIn case you have multiple screen sessions running on your machine, you will need to append the screen session ID after the r switch.
To find the session ID list the current running screen sessions with:
screen -lsThere are screens on:
10835.pts-0.linuxize-desktop (Detached)
10366.pts-0.linuxize-desktop (Detached)
2 Sockets in /run/screens/S-linuxize.
If you want to restore screen 10835.pts-0, then type the following command:
screen -r 10835Customize Linux Screen
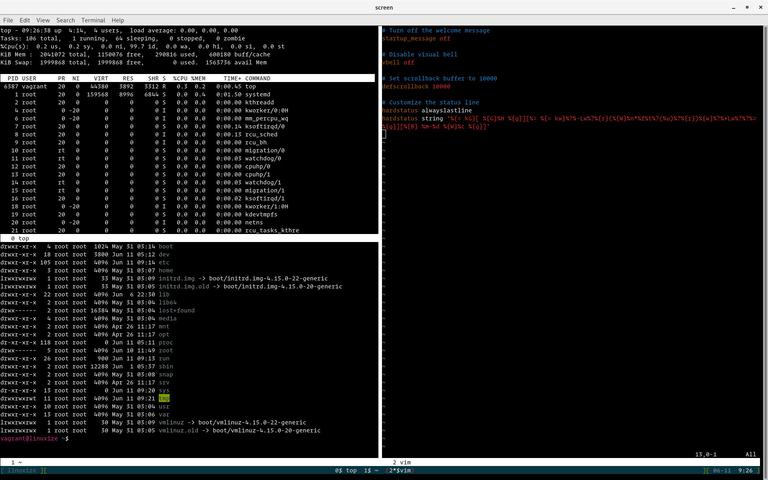
When screen is started, it reads its configuration parameters from /etc/screenrc and ~/.screenrc if the file is present. We can modify the default Screen settings according to our preferences using the .screenrc file.
Here is a sample ~/.screenrc configuration with customized status line and few additional options:~/.screenrc
# Turn off the welcome message
startup_message off

# Disable visual bell
vbell off

# Set scrollback buffer to 10000
defscrollback 10000

# Customize the status line
hardstatus alwayslastline
hardstatus string '%{= kG}[ %{G}%H %{g}][%= %{= kw}%?%-Lw%?%{r}(%{W}%n*%f%t%?(%u)%?%{r})%{w}%?%+Lw%?%?%= %{g}][%{B} %m-%d %{W}%c %{g}]'
Copy
How to Install PostgreSQL on Debian 9
How to Install PostgreSQL on Debian 9
Updated Feb 13, 2019•
5 min read
PostgreSQL, often known simply as Postgres, is an open-source general-purpose object-relational database management system. PostgreSQL has many advanced features such as online backups, point in time recovery, nested transactions, SQL and JSON querying, multi-version concurrency control (MVCC), asynchronous replication and more.
In this tutorial, we will show you how to install PostgreSQL on Debian 9 and explore the fundamentals of basic database administration.
Prerequisites
Before proceeding with this tutorial, make sure the user you are logged in as has sudo privileges .
Installing PostgreSQL
At the time of writing this article, the latest version of PostgreSQL available from the Debian repositories is PostgreSQL version 9.6.
To install PostgreSQL on your Debian server complete the following steps:
- Begin by updating the local package index:
sudo apt updateCopy - Install the PostgreSQL server and PostgreSQL contrib package which provides additional features for the PostgreSQL database:
sudo apt install postgresql postgresql-contribCopy - When the installation is completed, the PostgreSQL service will start automatically. To verify the installation we’ll connect to the PostgreSQL database server using the
psqlutility and print the server version :sudo -u postgres psql -c "SELECT version();"CopyThe output will look like this:version ----------------------------------------------------------------------------------------------------------- PostgreSQL 9.6.10 on x86_64-pc-linux-gnu, compiled by gcc (Debian 6.3.0-18+deb9u1) 6.3.0 20170516, 64-bit (1 row)Copy
Psql is an interactive terminal program that allows you to interact with the PostgreSQL server.
PostgreSQL Roles and Authentication Methods
PostgreSQL handles database access permissions using the concept of roles. A role can represent a database user or a group of database users.
PostgreSQL supports a number of authentication methods . The most commonly used methods are:
- Trust – With this method, the role can connect without a password, as long as the criteria defined in the
pg_hba.confare met. - Password – A role can connect by providing a password. The passwords can be stored as
scram-sha-256md5andpassword(clear-text) - Ident – This method is only supported on TCP/IP connections. Works by obtaining the client’s operating system user name, with an optional user name mapping.
- Peer – Same as Ident but it is only supported on local connections.
PostgreSQL client authentication is defined in the configuration file named pg_hba.conf. By default for local connections, PostgreSQL is set to use the peer authentication method.
The postgres user is created automatically when you install PostgreSQL. This user is the superuser for the PostgreSQL instance and it is equivalent to the MySQL root user.
To log in to the PostgreSQL server as the postgres user first you need to switch to the user postgres and then you can access a PostgreSQL prompt using the psql utility:
sudo su - postgrespsqlCopyCopy
From here, you can interact with your PostgreSQL instance. To exit out of the PostgreSQL shell type:
\q
You can use the sudo command to access the PostgreSQL prompt without switching users:
sudo -u postgres psqlThe postgres user is typically used only from the local host and it is recommended not to set the password for this user.
Creating PostgreSQL Role and Database
You can create new roles from the command line using the createuser command. Only superusers and roles with CREATEROLE privilege can create new roles.
In the following example, we will create a new role named john a database named johndb and grant privileges on the database.
- Create a new PostgreSQL RoleThe following command will create a new role named “john”:
sudo su - postgres -c "createuser john"Copy - Create a new PostgreSQL DatabaseCreate a new database named “johndb” using the
createdbcommand:sudo su - postgres -c "createdb johndb"Copy - Grant privilegesTo grant permissions to the
johnuser on the database we created in the previous step, connect to the PostgreSQL shell:sudo -u postgres psqlCopyand run the following query:GRANT ALL PRIVILEGES ON DATABASE johndb TO john;Copy
Enable remote access to PostgreSQL server
By default the PostgreSQL, server listens only on the local interface 127.0.0.1. To enable remote access to your PostgreSQL server open the configuration file postgresql.conf and add listen_addresses = '*' in the CONNECTIONS AND AUTHENTICATION section.
sudo vim /etc/postgresql/9.6/main/postgresql.conf/etc/postgresql/9.6/main/postgresql.conf
#------------------------------------------------------------------------------
# CONNECTIONS AND AUTHENTICATION
#------------------------------------------------------------------------------

# - Connection Settings -

listen_addresses = '*'     # what IP address(es) to listen on;
save the file and restart the PostgreSQL service with:
sudo service postgresql restartVerify the changes with the ss utility:
ss -nlt | grep 5432LISTEN 0 128 0.0.0.0:5432 0.0.0.0:*
LISTEN 0 128 [::]:5432 [::]:*
As you can see from the output above the PostgreSQL server is listening on all interfaces (0.0.0.0).
The last step is to configure the server to accept remote connections by editing the pg_hba.conf file.
Below are some examples showing different use cases:/etc/postgresql/9.6/main/pg_hba.conf
# TYPE  DATABASE        USER            ADDRESS                 METHOD

# The user jane will be able to access all databases from all locations using a md5 password
host    all             jane            0.0.0.0/0                md5

# The user jane will be able to access only the janedb from all locations using a md5 password
host    janedb          jane            0.0.0.0/0                md5

# The user jane will be able to access all databases from a trusted location (192.168.1.134) without a password
host    all             jane            192.168.1.134            trust
Conclusion
You have learned how to install and configure PostgreSQL on your Debian 9 server. For more information on this topic, consult the PostgreSQL Documentation .
If you have any questions, please leave a comment below.
How To Setup a Firewall with UFW on an Ubuntu and Debian Cloud Server.
Introduction
One of the first lines of defense in securing your cloud server is a functioning firewall. In the past, this was often done through complicated and arcane utilities. There is a lot of functionality built into these utilities, iptables being the most popular nowadays, but they require a decent effort on behalf of the user to learn and understand them. Firewall rules are not something you want yourself second-guessing.
To this end, UFW is a considerably easier-to-use alternative.
What is UFW?
UFW, or Uncomplicated Firewall, is a front-end to iptables. Its main goal is to make managing your firewall drop-dead simple and to provide an easy-to-use interface. It’s well-supported and popular in the Linux community—even installed by default in a lot of distros. As such, it’s a great way to get started securing your server.
Before We Get Started
First, obviously, you want to make sure UFW is installed. It should be installed by default in Ubuntu, but if for some reason it’s not, you can install the package using aptitude or apt-get using the following commands:
sudo aptitude install ufw
or
sudo apt-get install ufw
Check the Status
You can check the status of UFW by typing:
sudo ufw status
Right now, it will probably tell you it is inactive. Whenever ufw is active, you’ll get a listing of the current rules that looks similar to this:
Status: active

To               Action      From
--               ------      ----
22               ALLOW       Anywhere
Using IPv6 with UFW
If your VPS is configured for IPv6, ensure that UFW is configured to support IPv6 so that will configure both your IPv4 and IPv6 firewall rules. To do this, open the UFW configuration with this command:
sudo vi /etc/default/ufw
Then make sure “IPV6” is set to “yes”, like so:
IPV6=yes
Save and quit. Then restart your firewall with the following commands:
sudo ufw disable
sudo ufw enable
Now UFW will configure the firewall for both IPv4 and IPv6, when appropriate.
Set Up Defaults
One of the things that will make setting up any firewall easier is to define some default rules for allowing and denying connections. UFW’s defaults are to deny all incoming connections and allow all outgoing connections. This means anyone trying to reach your cloud server would not be able to connect, while any application within the server would be able to reach the outside world. To set the defaults used by UFW, you would use the following commands:
sudo ufw default deny incoming
and
sudo ufw default allow outgoing
Note: if you want to be a little bit more restrictive, you can also deny all outgoing requests as well. The necessity of this is debatable, but if you have a public-facing cloud server, it could help prevent against any kind of remote shell connections. It does make your firewall more cumbersome to manage because you’ll have to set up rules for all outgoing connections as well. You can set this as the default with the following:
sudo ufw default deny outgoing
Allow Connections
The syntax is pretty simple. You change the firewall rules by issuing commands in the terminal. If we turned on our firewall now, it would deny all incoming connections. If you’re connected over SSH to your cloud server, that would be a problem because you would be locked out of your server. Let’s enable SSH connections to our server to prevent that from happening:
sudo ufw allow ssh
As you can see, the syntax for adding services is pretty simple. UFW comes with some defaults for common uses. Our SSH command above is one example. It’s basically just shorthand for:
sudo ufw allow 22/tcp
This command allows a connection on port 22 using the TCP protocol. If our SSH server is running on port 2222, we could enable connections with the following command:
sudo ufw allow 2222/tcp
Other Connections We Might Need
Now is a good time to allow some other connections we might need. If we’re securing a web server with FTP access, we might need these commands:
sudo ufw allow www or sudo ufw allow 80/tcp sudo ufw allow ftp or sudo ufw allow 21/tcp
You mileage will vary on what ports and services you need to open. There will probably be a bit of testing necessary. In addition, you want to make sure you leave your SSH connection allowed.
Port Ranges
You can also specify port ranges with UFW. To allow ports 1000 through 2000, use the command:
sudo ufw allow 1000:2000/tcp
If you want UDP:
sudo ufw allow 1000:2000/udp
IP Addresses
You can also specify IP addresses. For example, if I wanted to allow connections from a specific IP address (say my work or home address), I’d use this command:
sudo ufw allow from 192.168.255.255
Denying Connections
Our default set up is to deny all incoming connections. This makes the firewall rules easier to administer since we are only selectively allowing certain ports and IP addresses through. However, if you want to flip it and open up all your server’s ports (not recommended), you could allow all connections and then restrictively deny ports you didn’t want to give access to by replacing “allow” with “deny” in the commands above. For example:
sudo ufw allow 80/tcp
would allow access to port 80 while:
sudo ufw deny 80/tcp
would deny access to port 80.
Deleting Rules
There are two options to delete rules. The most straightforward one is to use the following syntax:
sudo ufw delete allow ssh
As you can see, we use the command “delete” and input the rules you want to eliminate after that. Other examples include:
sudo ufw delete allow 80/tcp
or
sudo ufw delete allow 1000:2000/tcp
This can get tricky when you have rules that are long and complex.
A simpler, two-step alternative is to type:
sudo ufw status numbered
which will have UFW list out all the current rules in a numbered list. Then, we issue the command:
sudo ufw delete [number]
where “[number]” is the line number from the previous command.
Turn It On
After we’ve gotten UFW to where we want it, we can turn it on using this command (remember: if you’re connecting via SSH, make sure you’ve set your SSH port, commonly port 22, to be allowed to receive connections):
sudo ufw enable
You should see the command prompt again if it all went well. You can check the status of your rules now by typing:
sudo ufw status
or
sudo ufw status verbose
for the most thorough display.
To turn UFW off, use the following command:
sudo ufw disable
Reset Everything
If, for whatever reason, you need to reset your cloud server’s rules to their default settings, you can do this by typing this command:
sudo ufw reset
Conclusion
You should now have a cloud server that is configured properly to restrict access to a subset of ports or IP addresses.
Restore pfSense From Backup Using The CLI (command line)
When all goes bad and you can’t get to the web interface of your Netgate pfSense, you’ll have no option but to try using the CLI (command line). This happened to me recently and this article explains what i did to recover.
A few worthy points:
- The pfSense configuration file (a single file) is stored in “/cf/conf/config.xml“.
- Backup configuration files are stored in “/cf/conf/backup/“.
- Copying the configuration file from the backup location over the top of the current configuration is effectively the restore process.
These are the steps to restore back to a previous state. I’m assuming the system wont boot as normal and therefore “single user” mode is needed.
- Boot the Netgate with the mini-USB cable connecting the Netgate appliance to your workstation.
- Very near the start of the booting process, there’s a prompt to boot with options. Select to boot into “single user” mode.
- When you get a prompt, remount the filesystem into read/write mode using “mount -u /cf”.
- Check the filesystem for errors and repair them with “fsck -yf /“.
- Locate and copy the restore file from the “/cf/conf/backup/” directory. Go back a few stages (not the latest file) based on the times of the backup files. Copy it with “cp /cf/conf/backup/config-1593242670.xml /cf/config/config.xml“.
- Remove the file “/tmp/config.cache” using “rm /tmp/config.cache“.
- Run the command “/etc/rc.reload_all start“.
- Reboot using “reboot“.
When the device reboots, it should be back-dated (in terms of the config) to the date of the restore file.
Procedimento para Restaurar Backup Pfsense shell.
Copia e renomeia o backup para /conf/config.xml.
Depois disso, reboot.
Problemas com drivers de rede realtek RTL 8111E
re0: <RealTek 8168/8111 B/C/CP/D/DP/E PCIe Gigabit Ethernet> port
0xe800-0xe8ff mem 0xfdfff000-0xfdffffff,0xfdff8000-0xfdffbfff irq 16 at
device 0.0 on pci2
re0: Using 1 MSI messages
re0: Chip rev. 0x2c800000
re0: MAC rev. 0x00000000
re0: Unknown H/W revision: 0x2c800000
device_attach: re0 attach returned 6
Baixe o modulo https://github.com/downloads/kelsen/modulos/if_re.ko
#copie para o diretório dos modulos
cp if_re.ko /boot/modules/
#carregue o modulo
kldload if_re.ko
Se tudo sair como esperado, a placa deverá ser reconhecida e então
configurada com ifconfig.
#carregar o modulo no boot
#edite /boot/loader.conf
#insira a linha
if_re_load=”yes”
achei aqui: http://forum.pfsense.org/index.php/topic,55563.msg299104.html
Instalando Patch para pacotes extraoficiais
Instalando System Patch.
O System Patch é o pacote responsável por gerenciar os paches dentro do pfSense®, para instala-lo basta acessar o gerenciador de pacotes e busca-lo.

Acessando o System Patches

Configurando um patch
O procedimento abordado para essa configuração do patch também pode ser visto abaixo, ou vídeo-tutorial da ConexTI® no Youtube. https://www.youtube.com/embed/i_FjN6o_6CQ
Adicionando no Patch
Para adicionar um novo patch basta clicar em “Add New Patch”

Coloque alguma descrição para identificar o patch, e no campo “Patch Contents” deve ser posto o conteudo abaixo tambem encontrado neste link, deixe os outros parâmetros como na imagem a cima e em seguida, salve.
--- /etc/inc/pkg-utils.orig 2018-09-24 17:51:32.458825000 -0300
+++ /etc/inc/pkg-utils.inc  2018-09-24 17:51:54.387033000 -0300
@@ -388,7 +388,7 @@
    if ($base_packages) {
        $repo_param = "";
    } else {
-       $repo_param = "-r {$g['product_name']}";
+       $repo_param = "";
    }

    /*
@@ -485,7 +485,7 @@
                $err);
            if (!$base_packages &&
                rtrim($out) != $g['product_name']) {
-               continue;
+               //continue;
            }

            $pkg_info['installed'] = true;
Testando e aplicando
Como termino precisamos Teste(Test) e aplique(Apply) o novo patch.

Após esse procedimento os pacotes extraoficiais já poderão ser encontrados e disponíveis para instalação.