Arquivo anual 15 de agosto de 2018

porplague70

O arquivo está bloqueado – como desbloquear.

Você não pode acessar os arquivos porque eles estão bloqueados e você encontra esses erros no seu arquivo de log:

{"reqId":"0DijSqEkfOg2iyh9VD8J","remoteAddr":"xx.xx.xx.xx","app":"webdav","message":"Exception: {\"Message\":\"HTTP\\\/1.1 423 \\\"path\\\/file.extension\\\" is locked\",\"Exception\":\"OCA\\\\DAV\\\\Connector\\\\Sabre\\\\Exception\\\\FileLocked\",\"Code\":0,\"Trace\":\"#0

Se você estiver executando a ramificação ownCloud 8.2.x, certifique-se de estar usando pelo menos 8.2.2 (as versões anteriores tinham um bug causando esse problema).

Desativar manualmente o estado de bloqueio:

  • coloque o ownCloud no modo de manutenção: edite config/config.phpe altere esta linha:
    'maintenance' => true,
  • Mesa vazia oc_file_locks: use ferramentas como o phpmyadmin ou conecte-se diretamente ao seu banco de dados e execute:
    DELETE FROM oc_file_locks WHERE 1
  • desativar o modo de manutenção (desfazer a primeira etapa).

Redefinir automaticamente o estado de bloqueio:
Normalmente ownCloud deve redefinir o estado bloqueado por conta própria através de trabalhos em segundo plano. Portanto, certifique-se de que seus cron-jobs sejam executados corretamente (a página de administração informa quando o cron foi executado pela última vez): https://doc.owncloud.org/server/9.0/admin_manual/configuration_server/background_jobs_configuration.html 3.4k 

Solução permanente (se acontecer regularmente)

porplague70

Criando partição maior que 2 TB no Linux

Descobri somente na pratica que o MBR está limitado para partições de até 2 TB, mas para maiores temos uma solução o GPT!

Para mais informações olhe as fontes!

Aqui vai como fazer:

Vendo dados do Disco

# fdisk -l /dev/sdb

Saida:

Disk /dev/sdb: 3000.6 GB, 3000592982016 bytes
255 heads, 63 sectors/track, 364801 cylinders
Units = cylinders of 16065 * 512 = 8225280 bytes
Sector size (logical/physical): 512 bytes / 512 bytes
I/O size (minimum/optimal): 512 bytes / 512 bytes
Disk identifier: 0x00000000
Disk /dev/sdb doesn't contain a valid partition table

Criar um partição de 3 TB

# parted /dev/sdb

Saída:

GNU Parted 2.3
Using /dev/sdb
Welcome to GNU Parted! Type 'help' to view a list of commands.
(parted)

Criando um novo rotulo do tipo GPT:

(parted) mklabel gpt

saída:

Warning: The existing disk label on /dev/sdb will be destroyed and all data on this disk will be lost. Do you want to continue?
Yes/No? yes
(parted)

Setar para TB a unidade de medida:

(parted) unit TB

Criando a partição com 3TB:

(parted) mkpart primary 0.00TB 3.00TB

Imprimindo o resultado:

(parted) print

Sample outputs:

Model: ATA ST33000651AS (scsi)
Disk /dev/sdb: 3.00TB
Sector size (logical/physical): 512B/512B
Partition Table: gpt
Number  Start   End     Size    File system  Name     Flags
 1      0.00TB  3.00TB  3.00TB  ext4         primary

Saindo e salvando as mudanças:

(parted) quit

Agora utilize o mkfs.ext4 para formatar a partição criada!

# mkfs.ext4 /dev/sdb1

porplague70

Tagging obvious Spam

Left Menu > Domain Templates > RBL Templates

Add: spamhaus-zen, spamcop.net, sorbs-dnsrbl

Left Menu > Domain Templates > Process Policy

Modify: Spam Lists to Be Spam = 1
(or 2 to be less aggressive)

Modify: Spam Lists to Reach High Score = 2
(or 3 to be less aggressive)

Left Menu > Mailborder Servers > MTA > Edit Postfix

Scroll down to “smtpd_recipient_restrictions” and add this above the “permit” statement:

reject_rbl_client zen.spamhaus.org,
reject_rbl_client bl.spamcop.net,
reject_rbl_client cbl.abuseat.org,
reject_rbl_client b.barracudacentral.org,

This will stop spam from being accepted by the server if the remote MTA is on any of the blacklists.

porplague70

pf2ad Script para aplicação de configuração do Samba para autenticação AD no Squid para o pfSense®

pf2ad

Script para aplicação de configuração do Samba para autenticação AD no Squid para o pfSense®


https://pf2ad.mundounix.com.br/pt/index.html

porplague70

How To Install and Secure phpMyAdmin with Apache on a CentOS 7 Server

Introduction

Relational database management systems like MySQL and MariaDB are needed for a significant portion of web sites and applications. However, not all users feel comfortable administering their data from the command line.

To solve this problem, a project called phpMyAdmin was created in order to offer an alternative in the form of a web-based management interface. In this guide, we will demonstrate how to install and secure a phpMyAdmin configuration on a CentOS 7 server. We will build this setup on top of the Apache web server, the most popular web server in the world.

Prerequisites

Before we begin, there are a few requirements that need to be settled.

To ensure that you have a solid base to build this system upon, you should run through our initial server setup guide for CentOS 7. Among other things, this will walk you through setting up a non-root user with sudo access for administrative commands.

The second prerequisite that must be fulfilled in order to start on this guide is to install a LAMP (Linux, Apache, MariaDB, and PHP) stack on your CentOS 7 server. This is the platform that we will use to serve our phpMyAdmin interface (MariaDB is also the database management software that we are wishing to manage). If you do not yet have a LAMP installation on your server, follow our tutorial on installing LAMP on CentOS 7.

When your server is in a properly functioning state after following these guides, you can continue on with the rest of this page.

Step One — Install phpMyAdmin

With our LAMP platform already in place, we can begin right away with installing the phpMyAdmin software. Unfortunately, phpMyAdmin is not available in CentOS 7’s default repository.

To get the packages we need, we’ll have to add an additional repo to our system. The EPEL repo (Extra Packages for Enterprise Linux) contains many additional packages, including the phpMyAdmin package we are looking for.

The EPEL repository can be made available to your server by installing a special package called epel-release. This will reconfigure your repository list and give you access to the EPEL packages.

To install, just type:

sudo yum install epel-release

Now that the EPEL repo is configured, you can install the phpMyAdmin package using the yum packaging system by typing:

sudo yum install phpmyadmin

The installation will now complete. The installation included an Apache configuration file that has already been put into place. We will need to modify this a bit to get it to work correctly for our installation.

Open the file in your text editor now so that we can make a few changes:

sudo nano /etc/httpd/conf.d/phpMyAdmin.conf

Inside, we see some directory blocks with some conditional logic to explain the access policy for our directory. There are two distinct directories that are defined, and within these, configurations that will be valid for both Apache 2.2 and Apache 2.4 (which we are running).

Currently, this setup is configured to deny access to any connection not being made from the server itself. Since we are working on our server remotely, we need to modify some lines to specify the IP address of your home connection.

Change any lines that read Require ip 127.0.0.1 or Allow from 127.0.0.1 to refer to your home connection’s IP address. If you need help finding the IP address of your home connection, check out the next section. There should be four locations in the file that must be changed:

. . .
Require ip your_workstation_IP_address
. . .
Allow from your_workstation_IP_address
. . .
Require ip your_workstation_IP_address
. . .
Allow from your_workstation_IP_address
. . .

When you are finished, restart the Apache web server to implement your modifications by typing:

sudo systemctl restart httpd.service

With that, our phpMyAdmin installation is now operational. To access the interface, go to your server’s domain name or public IP address followed by /phpMyAdmin, in your web browser:

http://server_domain_or_IP/phpMyAdmin

phpMyAdmin login screen

To sign in, use a username/password pair of a valid MariaDB user. The root user and the MariaDB administrative password is a good choice to get started. You will then be able to access the administrative interface:
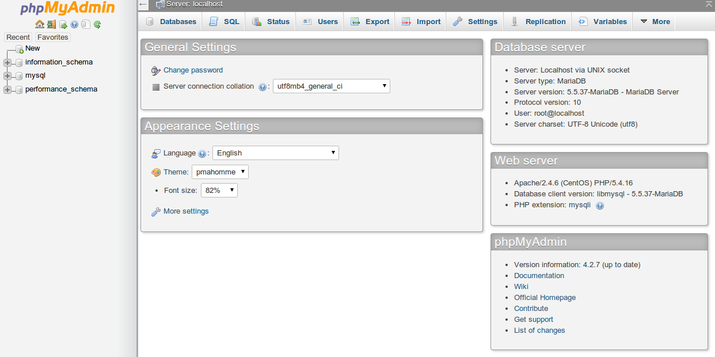
phpMyAdmin admin interface

Find Your IP Address

You will need to know the IP address of the computer you are using to access your databases in order to complete the step above. This is a security precaution so that unauthorized people cannot connect to your server.

Note: This is not the IP address of your VPS, it is the IP address of your home or work computer.

You can find out how the greater web sees your IP address by visiting one of these sites in your web browser:

Compare a few different sites and make sure they all give you the same value. Use this value in the configuration file above.

Step Two — Secure your phpMyAdmin Instance

The phpMyAdmin instance installed on our server should be completely usable at this point. However, by installing a web interface, we have exposed our MySQL system to the outside world.

Even with the included authentication screen, this is quite a problem. Because of phpMyAdmin’s popularity combined with the large amount of data it provides access to, installations like these are common targets for attackers.

We will implement two simple strategies to lessen the chances of our installation being targeted and compromised. We will change the location of the interface from /phpMyAdmin to something else to sidestep some of the automated bot brute-force attempts. We will also create an additional, web server-level authentication gateway that must be passed before even getting to the phpMyAdmin login screen.

Changing the Application’s Access Location

In order for our Apache web server to work with phpMyAdmin, our phpMyAdmin Apache configuration file uses an alias to point to the directory location of the files.

To change the URL where our phpMyAdmin interface can be accessed, we simply need to rename the alias. Open the phpMyAdmin Apache configuration file now:

sudo nano /etc/httpd/conf.d/phpMyAdmin.conf

Toward the top of the file, you will see two lines that look like this:

Alias /phpMyAdmin /usr/share/phpMyAdmin
Alias /phpmyadmin /usr/share/phpMyAdmin

These two lines are our aliases, which means that if we access our site’s domain name or IP address, followed by either /phpMyAdmin or /phpmyadmin, we will be served the content at /usr/share/phpMyAdmin.

We want to disable these specific aliases since they are heavily targeted by bots and malicious users. Instead, we should decide on our own alias. It should be easy to remember, but not easy to guess. It shouldn’t indicate the purpose of the URL location. In our case, we’ll go with /nothingtosee.

To apply our intended changes, we should remove or comment out the existing lines and add our own:

# Alias /phpMyAdmin /usr/share/phpMyAdmin
# Alias /phpmyadmin /usr/share/phpMyAdmin
Alias /nothingtosee /usr/share/phpMyAdmin

When you are finished, save and close the file.

To implement the changes, restart the web service:

sudo systemctl restart httpd.service

Now, if you go to the previous location of your phpMyAdmin installation, you will get a 404 error:

http://server_domain_or_IP/phpMyAdmin

phpMyAdmin 404 error

However, your phpMyAdmin interface will be available at the new location we selected:

http://server_domain_or_IP/nothingtosee

phpMyAdmin login screen

Setting up a Web Server Authentication Gate

The next feature we wanted for our installation was an authentication prompt that a user would be required to pass before ever seeing the phpMyAdmin login screen.

Fortunately, most web servers, including Apache, provide this capability natively. We will just need to modify our Apache configuration file to use an authorization file.

Open the phpMyAdmin Apache configuration file in your text editor again:

sudo nano /etc/httpd/conf.d/phpMyAdmin.conf

Within the /usr/share/phpMyAdmin directory block, but outside of any of the blocks inside, we need to add an override directive. It will look like this:

. . .
<Directory /usr/share/phpMyAdmin/>
   AllowOverride All
   <IfModule mod_authz_core.c>
   . . .
</Directory>
. . .

This will allow us to specify additional configuration details in a file called .htaccess located within the phpMyAdmin directory itself. We will use this file to set up our password authentication.

Save and close the file when you are finished.

Restart the web service to implement this change:

sudo systemctl restart httpd.service

Create an .htaccess File

Now that we have the override directive in our configuration, Apache will look for a file called .htaccesswithin the /usr/share/phpMyAdmin directory. If it finds one, it will use the directives contained within to supplement its previous configuration data.

Our next step is to create the .htaccess file within that directory. Use your text editor to do so now:

sudo nano /usr/share/phpMyAdmin/.htaccess

Within this file, we need to enter the following information:

AuthType Basic
AuthName "Admin Login"
AuthUserFile /etc/httpd/pma_pass
Require valid-user

Let’s go over what each of these lines mean:

  • AuthType Basic: This line specifies the authentication type that we are implementing. This type will implement password authentication using a password file.
  • AuthName: This sets the message for the authentication dialog box. You should keep this generic so that unauthorized users won’t gain knowledge about what is being protected.
  • AuthUserFile: This sets the location of the actual password file that will be used for authentication. This should be outside of the directories that are being served. We will create this file in a moment.
  • Require valid-user: This specifies that only authenticated users should be given access to this resource. This is what actually stops unauthorized users from entering.

When you are finished entering this information, save and close the file.

Create the Password File for Authentication

Now that we have specified the location for our password file through the use of the AuthUserFiledirective in our .htaccess file, we need to create and populate the password file.

This can be accomplished through the use of an Apache utility called htpasswd. We invoke the command by passing it the location where we would like to create the file and the username we would like to enter authentication details for:

sudo htpasswd -c /etc/httpd/pma_pass username

The -c flag indicates that this will create an initial file. The directory location is the path and filename that will be used for the file. The username is the first user we would like to add. You will be prompted to enter and confirm a password for the user.

If you want to add additional users to authenticate, you can call the same command again without the -cflag, and with a new username:

sudo htpasswd /etc/httpd/pma_pass seconduser

With our password file created, an authentication gateway has been implemented and we should now see a password prompt the next time we visit our site:

http://server_domain_or_IP/nothingtosee
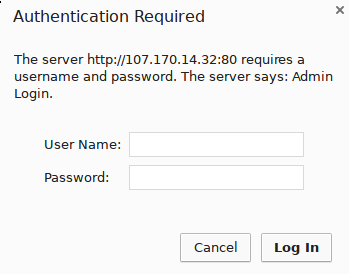
Apache authentication page

Once you enter your credentials, you will be taken to the normal phpMyAdmin login page. This added layer of protection will help keep your MySQL logs clean of authentication attempts in addition to the added security benefit.

Conclusion

You can now manage your MySQL databases from a reasonably secure web interface. This UI exposes most of the functionality that is available from the MySQL command prompt. You can view databases and schema, execute queries, and create new data sets and structures.

porplague70

How To Install Apache Tomcat 8 on CentOS 7

Introduction

Apache Tomcat is a web server and servlet container that is used to serve Java applications. Tomcat is an open source implementation of the Java Servlet and JavaServer Pages technologies, released by the Apache Software Foundation. This tutorial covers the basic installation and some configuration of the latest release of Tomcat 8 on your CentOS 7 server.

Prerequisites

Before you begin with this guide, you should have a separate, non-root user account set up on your server. You can learn how to do this by completing steps 1-3 in the initial server setup for CentOS 7. We will be using the demo user created here for the rest of this tutorial.

Install Java

Tomcat requires that Java is installed on the server, so any Java web application code can be executed. Let’s satisfy that requirement by installing OpenJDK 7 with yum.

To install OpenJDK 7 JDK using yum, run this command:

  • sudo yum install java-1.7.0-openjdk-devel

Answer y at the prompt to continue installing OpenJDK 7.

Note that a shortcut to the JAVA_HOME directory, which we will need to configure Tomcat later, can be found at /usr/lib/jvm/jre.

Now that Java is installed, let’s create a tomcat user, which will be used to run the Tomcat service.

Create Tomcat User

For security purposes, Tomcat should be run as an unprivileged user (i.e. not root). We will create a new user and group that will run the Tomcat service.

First, create a new tomcat group:

  • sudo groupadd tomcat

Then create a new tomcat user. We’ll make this user a member of the tomcat group, with a home directory of /opt/tomcat (where we will install Tomcat), and with a shell of /bin/false (so nobody can log into the account):

  • sudo useradd -M -s /bin/nologin -g tomcat -d /opt/tomcat tomcat

Now that our tomcat user is set up, let’s download and install Tomcat.

Install Tomcat

The easiest way to install Tomcat 8 at this time is to download the latest binary release then configure it manually.

Download Tomcat Binary

Find the latest version of Tomcat 8 at the Tomcat 8 Downloads page. At the time of writing, the latest version is 8.5.9. Under the Binary Distributions section, then under the Core list, copy the link to the “tar.gz”.

Let’s download the latest binary distribution to our home directory.

First, change to your home directory:

  • cd ~

Then use wget and paste in the link to download the Tomcat 8 archive, like this (your mirror link will probably differ from the example):

  • wget http://apache.mirrors.ionfish.org/tomcat/tomcat-8/v8.5.9/bin/apache-tomcat-8.5.9.tar.gz

We’re going to install Tomcat to the /opt/tomcat directory. Create the directory, then extract the the archive to it with these commands:

  • sudo mkdir /opt/tomcat
  • sudo tar xvf apache-tomcat-8*tar.gz -C /opt/tomcat –strip-components=1

Now we’re ready to set up the proper user permissions.

Update Permissions

The tomcat user that we set up needs to have the proper access to the Tomcat installation. We’ll set that up now.

Change to the Tomcat installation path:

  • cd /opt/tomcat

Give the tomcat group ownership over the entire installation directory:

  • sudo chgrp -R tomcat /opt/tomcat

Next, give the tomcat group read access to the conf directory and all of its contents, and execute access to the directory itself:

  • sudo chmod -R g+r conf
  • sudo chmod g+x conf

Then make the tomcat user the owner of the webappsworktemp, and logs directories:

  • sudo chown -R tomcat webapps/ work/ temp/ logs/

Now that the proper permissions are set up, let’s set up a Systemd unit file.

Install Systemd Unit File

Because we want to be able to run Tomcat as a service, we will set up a Tomcat Systemd unit file .

Create and open the unit file by running this command:

  • sudo vi /etc/systemd/system/tomcat.service

Paste in the following script. You may also want to modify the memory allocation settings that are specified in CATALINA_OPTS:

/etc/systemd/system/tomcat.service
# Systemd unit file for tomcat
[Unit]
Description=Apache Tomcat Web Application Container
After=syslog.target network.target

[Service]
Type=forking

Environment=JAVA_HOME=/usr/lib/jvm/jre
Environment=CATALINA_PID=/opt/tomcat/temp/tomcat.pid
Environment=CATALINA_HOME=/opt/tomcat
Environment=CATALINA_BASE=/opt/tomcat
Environment='CATALINA_OPTS=-Xms512M -Xmx1024M -server -XX:+UseParallelGC'
Environment='JAVA_OPTS=-Djava.awt.headless=true -Djava.security.egd=file:/dev/./urandom'

ExecStart=/opt/tomcat/bin/startup.sh
ExecStop=/bin/kill -15 $MAINPID

User=tomcat
Group=tomcat
UMask=0007
RestartSec=10
Restart=always

[Install]
WantedBy=multi-user.target

Save and exit. This script tells the server to run the Tomcat service as the tomcat user, with the settings specified.

Now reload Systemd to load the Tomcat unit file:

  • sudo systemctl daemon-reload

Now you can start the Tomcat service with this systemctl command:

  • sudo systemctl start tomcat

Check that the service successfully started by typing:

  • sudo systemctl status tomcat

If you want to enable the Tomcat service, so it starts on server boot, run this command:

  • sudo systemctl enable tomcat

Tomcat is not completely set up yet, but you can access the default splash page by going to your domain or IP address followed by :8080 in a web browser:

Open in web browser:
http://server_IP_address:8080

You will see the default Tomcat splash page, in addition to other information. Now we will go deeper into the installation of Tomcat.

Configure Tomcat Web Management Interface

In order to use the manager webapp that comes with Tomcat, we must add a login to our Tomcat server. We will do this by editing the tomcat-users.xml file:

  • sudo vi /opt/tomcat/conf/tomcat-users.xml

This file is filled with comments which describe how to configure the file. You may want to delete all the comments between the following two lines, or you may leave them if you want to reference the examples:

tomcat-users.xml excerpt
<tomcat-users>
...
</tomcat-users>

You will want to add a user who can access the manager-gui and admin-gui (webapps that come with Tomcat). You can do so by defining a user similar to the example below. Be sure to change the username and password to something secure:

tomcat-users.xml — Admin User
<tomcat-users>
    <user username="admin" password="password" roles="manager-gui,admin-gui"/>
</tomcat-users>

Save and quit the tomcat-users.xml file.

By default, newer versions of Tomcat restrict access to the Manager and Host Manager apps to connections coming from the server itself. Since we are installing on a remote machine, you will probably want to remove or alter this restriction. To change the IP address restrictions on these, open the appropriate context.xml files.

For the Manager app, type:

  • sudo vi /opt/tomcat/webapps/manager/META-INF/context.xml

For the Host Manager app, type:

  • sudo vi /opt/tomcat/webapps/host-manager/META-INF/context.xml

Inside, comment out the IP address restriction to allow connections from anywhere. Alternatively, if you would like to allow access only to connections coming from your own IP address, you can add your public IP address to the list:

context.xml files for Tomcat webapps
<Context antiResourceLocking="false" privileged="true" >
  <!--<Valve className="org.apache.catalina.valves.RemoteAddrValve"
         allow="127\.\d+\.\d+\.\d+|::1|0:0:0:0:0:0:0:1" />-->
</Context>

Save and close the files when you are finished.

To put our changes into effect, restart the Tomcat service:

  • sudo systemctl restart tomcat

Access the Web Interface

Now that Tomcat is up and running, let’s access the web management interface in a web browser. You can do this by accessing the public IP address of the server, on port 8080:

Open in web browser:
http://server_IP_address:8080

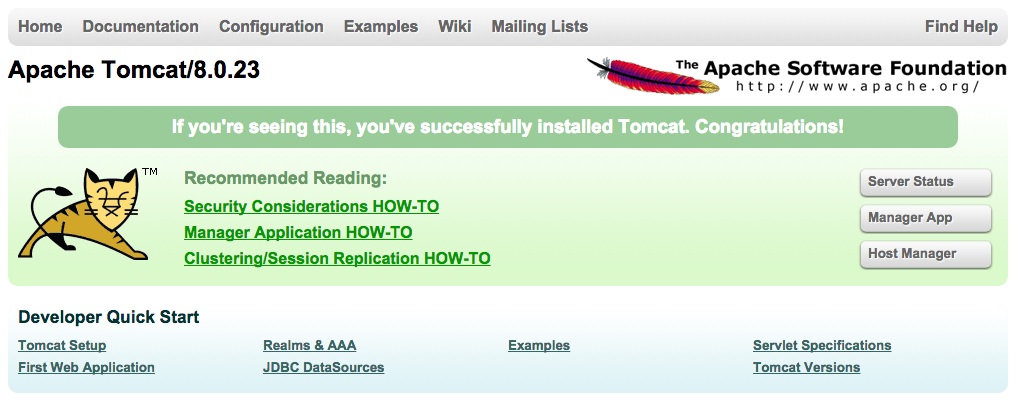
You will see something like the following image:

Tomcat root

As you can see, there are links to the admin webapps that we configured an admin user for.

Let’s take a look at the Manager App, accessible via the link or http://server_IP_address:8080/manager/html:

Tomcat Web Application Manager

The Web Application Manager is used to manage your Java applications. You can Start, Stop, Reload, Deploy, and Undeploy here. You can also run some diagnostics on your apps (i.e. find memory leaks). Lastly, information about your server is available at the very bottom of this page.

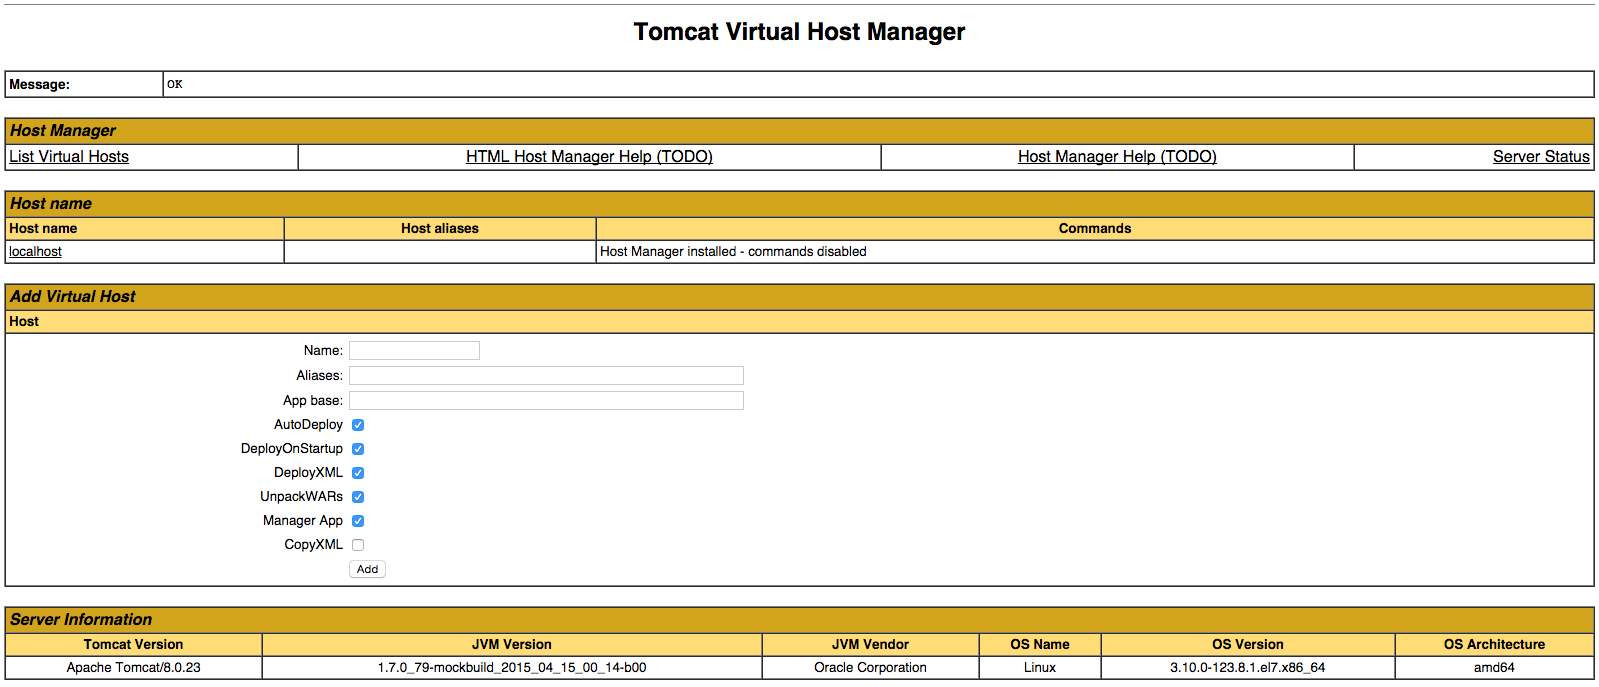
Now let’s take a look at the Host Manager, accessible via the link or http://server_IP_address:8080/host-manager/html/:

Tomcat Virtual Host Manager

From the Virtual Host Manager page, you can add virtual hosts to serve your applications from.

Conclusion

Your installation of Tomcat is complete! Your are now free to deploy your own Java web applications!

porplague70

How To Install Linux, Apache, MySQL, PHP (LAMP) stack On CentOS 7

Introduction

A “LAMP” stack is a group of open source software that is typically installed together to enable a server to host dynamic websites and web apps. This term is actually an acronym which represents the Linux operating system, with the Apache web server. The site data is stored in a MySQL database (using MariaDB), and dynamic content is processed by PHP.

In this guide, we’ll get a LAMP stack installed on an CentOS 7 VPS. CentOS will fulfill our first requirement: a Linux operating system.

Note: The LAMP stack can be installed automatically on your Droplet by adding this script to its User Data when launching it. Check out this tutorial to learn more about Droplet User Data.

Prerequisites

Before you begin with this guide, you should have a separate, non-root user account set up on your server. You can learn how to do this by completing steps 1-4 in the initial server setup for CentOS 7.

Step One — Install Apache

The Apache web server is currently the most popular web server in the world, which makes it a great default choice for hosting a website.

We can install Apache easily using CentOS’s package manager, yum. A package manager allows us to install most software pain-free from a repository maintained by CentOS. You can learn more about how to use yum here.

For our purposes, we can get started by typing these commands:

sudo yum install httpd

Since we are using a sudo command, these operations get executed with root privileges. It will ask you for your regular user’s password to verify your intentions.

Afterwards, your web server is installed.

Once it installs, you can start Apache on your VPS:

sudo systemctl start httpd.service

You can do a spot check right away to verify that everything went as planned by visiting your server’s public IP address in your web browser (see the note under the next heading to find out what your public IP address is if you do not have this information already):

http://your_server_IP_address/

You will see the default CentOS 7 Apache web page, which is there for informational and testing purposes. It should look something like this:

CentOS 7 Apache default

If you see this page, then your web server is now correctly installed.

The last thing you will want to do is enable Apache to start on boot. Use the following command to do so:

sudo systemctl enable httpd.service

How To Find your Server’s Public IP Address

If you do not know what your server’s public IP address is, there are a number of ways you can find it. Usually, this is the address you use to connect to your server through SSH.

From the command line, you can find this a few ways. First, you can use the iproute2 tools to get your address by typing this:

ip addr show eth0 | grep inet | awk '{ print $2; }' | sed 's/\/.*$//'

This will give you one or two lines back. They are both correct addresses, but your computer may only be able to use one of them, so feel free to try each one.

An alternative method is to use an outside party to tell you how it sees your server. You can do this by asking a specific server what your IP address is:

curl http://icanhazip.com

Regardless of the method you use to get your IP address, you can type it into your web browser’s address bar to get to your server.

Step Two — Install MySQL (MariaDB)

Now that we have our web server up and running, it is time to install MariaDB, a MySQL drop-in replacement. MariaDB is a community-developed fork of the MySQL relational database management system. Basically, it will organize and provide access to databases where our site can store information.

Again, we can use yum to acquire and install our software. This time, we’ll also install some other “helper” packages that will assist us in getting our components to communicate with each other:

sudo yum install mariadb-server mariadb

When the installation is complete, we need to start MariaDB with the following command:

sudo systemctl start mariadb

Now that our MySQL database is running, we want to run a simple security script that will remove some dangerous defaults and lock down access to our database system a little bit. Start the interactive script by running:

sudo mysql_secure_installation

The prompt will ask you for your current root password. Since you just installed MySQL, you most likely won’t have one, so leave it blank by pressing enter. Then the prompt will ask you if you want to set a root password. Go ahead and enter Y, and follow the instructions:

Enter current password for root (enter for none):
OK, successfully used password, moving on...

Setting the root password ensures that nobody can log into the MariaDB
root user without the proper authorization.

New password: password
Re-enter new password: password
Password updated successfully!
Reloading privilege tables..
 ... Success!

For the rest of the questions, you should simply hit the “ENTER” key through each prompt to accept the default values. This will remove some sample users and databases, disable remote root logins, and load these new rules so that MySQL immediately respects the changes we have made.

The last thing you will want to do is enable MariaDB to start on boot. Use the following command to do so:

sudo systemctl enable mariadb.service

At this point, your database system is now set up and we can move on.

Step Three — Install PHP

PHP is the component of our setup that will process code to display dynamic content. It can run scripts, connect to our MySQL databases to get information, and hand the processed content over to our web server to display.

We can once again leverage the yum system to install our components. We’re going to include the php-mysql package as well:

sudo yum install php php-mysql

This should install PHP without any problems. We need to restart the Apache web server in order for it to work with PHP. You can do this by typing this:

sudo systemctl restart httpd.service

Install PHP Modules

To enhance the functionality of PHP, we can optionally install some additional modules.

To see the available options for PHP modules and libraries, you can type this into your system:

yum search php-

The results are all optional components that you can install. It will give you a short description for each:

php-bcmath.x86_64 : A module for PHP applications for using the bcmath library
php-cli.x86_64 : Command-line interface for PHP
php-common.x86_64 : Common files for PHP
php-dba.x86_64 : A database abstraction layer module for PHP applications
php-devel.x86_64 : Files needed for building PHP extensions
php-embedded.x86_64 : PHP library for embedding in applications
php-enchant.x86_64 : Enchant spelling extension for PHP applications
php-fpm.x86_64 : PHP FastCGI Process Manager
php-gd.x86_64 : A module for PHP applications for using the gd graphics library
. . .

To get more information about what each module does, you can either search the internet, or you can look at the long description in the package by typing:

yum info package_name

There will be a lot of output, with one field called Description which will have a longer explanation of the functionality that the module provides.

For example, to find out what the php-fpm module does, we could type this:

yum info php-fpm

Along with a large amount of other information, you’ll find something that looks like this:

. . .
Summary     : PHP FastCGI Process Manager
URL         : http://www.php.net/
License     : PHP and Zend and BSD
Description : PHP-FPM (FastCGI Process Manager) is an alternative PHP FastCGI
            : implementation with some additional features useful for sites of
            : any size, especially busier sites.

If, after researching, you decide you would like to install a package, you can do so by using the yum install command like we have been doing for our other software.

If we decided that php-fpm is something that we need, we could type:

sudo yum install php-fpm

If you want to install more than one module, you can do that by listing each one, separated by a space, following the yum install command, like this:

sudo yum install package1 package2 ...

At this point, your LAMP stack is installed and configured. We should still test out our PHP though.

Step Four — Test PHP Processing on your Web Server

In order to test that our system is configured properly for PHP, we can create a very basic PHP script.

We will call this script info.php. In order for Apache to find the file and serve it correctly, it must be saved to a very specific directory, which is called the “web root”.

In CentOS 7, this directory is located at /var/www/html/. We can create the file at that location by typing:

sudo vi /var/www/html/info.php

This will open a blank file. We want to put the following text, which is valid PHP code, inside the file:

<?php phpinfo(); ?>

When you are finished, save and close the file.

If you are running a firewall, run the following commands to allow HTTP and HTTPS traffic:

sudo firewall-cmd --permanent --zone=public --add-service=http 
sudo firewall-cmd --permanent --zone=public --add-service=https
sudo firewall-cmd --reload

Now we can test whether our web server can correctly display content generated by a PHP script. To try this out, we just have to visit this page in our web browser. You’ll need your server’s public IP address again.

The address you want to visit will be:

http://your_server_IP_address/info.php

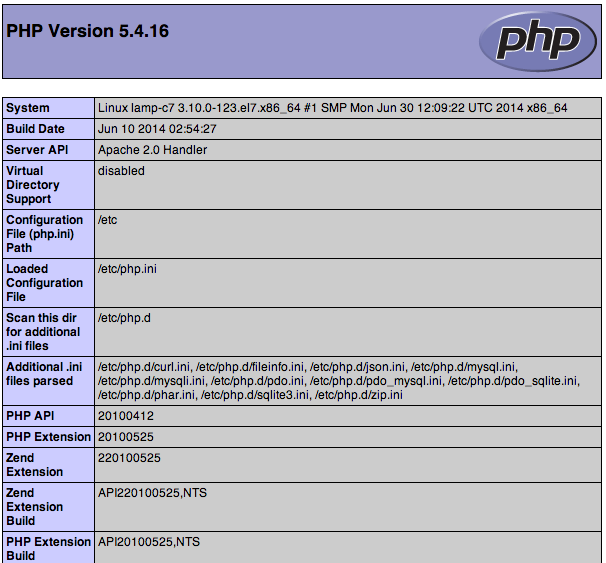
The page that you come to should look something like this:

CentOS 7 default PHP info

This page basically gives you information about your server from the perspective of PHP. It is useful for debugging and to ensure that your settings are being applied correctly.

If this was successful, then your PHP is working as expected.

You probably want to remove this file after this test because it could actually give information about your server to unauthorized users. To do this, you can type this:

sudo rm /var/www/html/info.php

You can always recreate this page if you need to access the information again later.

Conclusion

Now that you have a LAMP stack installed, you have many choices for what to do next. Basically, you’ve installed a platform that will allow you to install most kinds of websites and web software on your server.

porplague70

How to Stop and Disable FireHow to Stop and Disable Firewalld on CentOS 7

Firewalld is a complete firewall solution that has been made available by default on all CentOS 7 servers, including Liquid Web Core Managed CentOS 7, and Liquid Web Self Managed CentOS 7. On occasion, perhaps for testing, disabling or stopping firewalld may be necessary. Follow the instructions below to disable firewalld and stop firewalld.

It is highly recommended that you have another firewall protecting your network or server before, or immediately after, disabling firewalld.

Pre-Flight Check

  • These instructions are intended specifically for stopping and disabling firewalld CentOS 7.
  • I’ll be working from a Liquid Web Self Managed CentOS 7 server, and I’ll be logged in as root.

Disable Firewalld

To disable firewalld, run the following command as root:

systemctl disable firewalld

Stop Firewalld

To stop firewalld, run the following command as root:

systemctl stop firewalld

Check the Status of Firewalld

And finally, to check the status of firewalld, run the following command as root:

systemctl status firewalld

Wait, you actually wanted to Start and Enable Firewalld on CentOS 7? Then hit our tutorial on: How to Start and Enable Firewalld on CentOS 7!

porplague70

Setting up WPAD Autoconfigure for the Squid Package.

Setting up WPAD Autoconfigure for the Squid Package

pfSense can be configured to serve up automatic proxy configuration data to clients to point users to squid running either on pfSense or another local system, assuming their systems settings are configured for this behavior. Though the data can be served from the firewall, the task is better suited for another local web server if one is available.

Note

To use the web server on the firewall to serve this data, the GUI must run in HTTP mode, or the vhosts package may be used to setup an alternate HTTP server on port 80. Neither of these are recommended as much as running a separate local web server for this task.

This process is known as WPAD, short for Web Proxy AutoDiscovery Protocol. If a web browser is configured for autodiscovery, it will try a few methods to figure out a proxy’s location.

A WPAD host may be supplied via DHCP numbered option 252 (string value containing the entire URL to the WPAD file) or DNS, which is easy to do with the built-in DNS forwarder.

Why would this be done?

To use squid authentication, squid cannot be used in transparent mode. HTTPS traffic also cannot be filtered using transparent mode. When squid is run in normal mode, a proxy IP and port must be configured on each client machine, which can be tedious. This can also cause problems on road warrior laptops that come in and out of the network. Rather than resetting their proxy configuration each time they enter and leave, autoconfigure will let them come and go without much trouble.

Most, if not all, modern browsers ship with the autoconfigure setting turned off, so it may still be necessary to push/enter this setting to client PCs. Even so, another advantage of using autoconfigure is that should squid move to another IP address, only one file must be changed to inform the clients of the updated IP address. (This may be easy to pull off in a windows domain with AD, but not for many others!)

Prerequisites

This How-To assumes squid is already operating in a non-transparent configuration. For help with that, look elsewhere in this documentation and on the Forums.

Create wpad.dat

Before starting, a wpad.dat file must be crafted. This is a single file with a JavaScript function which tells the browser how to find a proxy hostname and port. This function can be as simple or as complex as desired, there are many examples on the web. In this example, all clients will be directed to the squid instance on the firewall.

The contents of the example wpad.dat file are:

function FindProxyForURL(url,host)
{
return "PROXY 192.168.1.1:3128";
}

The function in that file tells the browser to look for a proxy on 192.168.1.1 at port 3128.

Now upload that file to pfSense or another locally accessible web server with scp, or create it using the built-in file editor. The file must go in /usr/local/www/.

Due to the different ways that various browser versions try to access the file, this same code should exist in at least three different places:

/usr/local/www/wpad.dat
/usr/local/www/wpad.da
/usr/local/www/proxy.pac

(More advanced users might do this from the shell and use ln to link the files.)

We recommend pointing wpad. to an internal web server which can answer requests for the wpad.dat and associated files. It can be any web server, but typically must be served from both the default VirtualHost as well as one named wpad, due to differences in how browsers request the file.

To make this work using pfSense to serve the file, local IP addresses will need to be able to access the local interface IP address of the pfSense router. They do not need to access the WebGUI with a password, this file will be served without authentication. The GUI must also be run in HTTP mode, which is less secure. If the GUI is set to use HTTP, never open up access to the GUI over the WAN.

Configure DNS

Now to setup the DNS portion. WPAD will take the domain name given to the machine, likely assigned by DHCP, and prepend wpad.. If the domain is example.com, it will look for wpad.example.com. This task may be accomplished with the DNS Forwarder/DNS Resolver in pfSense or with another internal DNS server used by client PCs.

A client browser will ultimately try to access http://wpad.example.com/wpad.dat – among others. More details on the hostnames tried by WPAD are available in the WPAD article on Wikipedia.

To add the entry using the DNS forwarder on pfSense, navigate to Services > DNS Forwarder. Click fa-plus to add a new Host Override.

Enter the following (Replace the domain and IP address with their actual values):

  • Hostwpad
  • Domainexample.com
  • IP Address192.168.1.1
  • DescriptionWPAD Autoconfigure Host

Click Save.

Block Port 80 Out from LAN

Create a firewall rule at the TOP of the LAN tab (or appropriate interface) that blocks anything from <internal subnet> to * on port 80.

Note

If the firewall is used to serve WPAD and the WebGUI anti-lockout rule has been disabled, web traffic must also be allowed to the pfSense firewall GUI port. If this is not acceptable, point wpad. to another internal web server which can answer requests for the wpad.dat and associated files.

Test Clients

Fire up a browser on a client behind the pfSense firewall, and see what happens. If squid is configured for authentication, the client will be greeted with a login prompt. Otherwise, check squid’s logs to ensure traffic is going through the proxy. A proxy test site such ashttp://www.lagado.com/proxy-test can also be useful.

If nothing happened, check the browser settings. Many modern browsers ship with the autoconfigure settings off.

Internet Explorer

  • Open Internet Options
  • Click the Connections tab
  • Click the LAN Settings button
  • Check Automatically Detect Settings
  • Click OK, and OK again.

Firefox

  • Click Tools (Or the three bar icon)
  • Click Options
  • Click Advanced
  • Click the Network tab
  • Click the Settings button
  • Select Auto-detect proxy settings for this network
  • Click OK
porplague70

Endereços IP de acesso aos webservices da Nota Fiscal Eletrônica. SEFAZ

Atenção para os endereços IP de acesso aos ambientes de produção e homologação da NFE. As empresas que possuem firewall devem estar liberando conexão pela porta 443 para *TODAS* as seguintes redes:
 
 Produção  189.2.188.128/26  187.5.111.0/25  201.48.19.0/26
 Homologação  189.2.188.178  187.5.111.50  201.48.19.50