Categoria Dicas&Soluções

porplague70

How to disable Ipv6 on Ubuntu, Linux Mint, Debian.

Ipv6

Ipv6 is the next version of the addressing scheme Ipv4 that is currently being used to assign numerical address to domain names like google.com over the internet.

Ipv6 allows for more addresses than what Ipv4 supports. However it is not yet widely supported and its adoption is still in progress.

Does your system support ipv6 ?

Check out http://testmyipv6.com/ to see if you network supports Ipv6.

For Ipv6 to work you need –

1. An OS that supports IPv6. Ubuntu and most modern Linuxes do that.
2. Your network hardware (router/modem) must support Ipv6. Many of the good brands do.
3. Your ISP must also support IPv6. This is something that is not present everywhere !

Check the output of ifconfig command to see the “inet6 addr” line.

$ ifconfig
eth0      Link encap:Ethernet  HWaddr 00:1c:c0:f8:79:ee  
          inet addr:192.168.1.2  Bcast:192.168.1.255  Mask:255.255.255.0
          inet6 addr: fe80::21c:c0ff:fef8:79ee/64 Scope:Link
          UP BROADCAST RUNNING MULTICAST  MTU:1500  Metric:1
.....

Problems if ipv6 not supported

So if ipv6 is not supported on your network infrastructure, it might be useful to disable it all together. It can cause issues like delayed domain lookups, un-necessary attempts to connect to ipv6 addresses causing delay in network connection etc.

I did come across some problems like that. The apt-get command occasionally tries to connect to ipv6 addresses and fails and then retries an ipv4 address. Take a look at this output

$ sudo apt-get update
Ign http://archive.canonical.com trusty InRelease
Ign http://archive.canonical.com raring InRelease                                                                                                    
Err http://archive.canonical.com trusty Release.gpg                                                                                                  
  Cannot initiate the connection to archive.canonical.com:80 (2001:67c:1360:8c01::1b). - connect (101: Network is unreachable) [IP: 2001:67c:1360:8c01::1b 80]
Err http://archive.canonical.com raring Release.gpg                                                                                                  
  Cannot initiate the connection to archive.canonical.com:80 (2001:67c:1360:8c01::1b). - connect (101: Network is unreachable) [IP: 2001:67c:1360:8c01::1b 80]

.....

Errors like those have been more frequent in the recent Ubuntu versions, probably because they try to use Ipv6 more than before.


I noticed similar issues happen in other applications like Hexchat and also Google Chrome which would sometimes take longer than usual to lookup a domain name.

So the best solution is to disable Ipv6 entirely to get rid of those things. It takes only a small configuration and can help you solve many network issues on your system. Users have even reported an increase in internet speed.

Method 1 – Disable from sysctl

The first method to disable Ipv6 is to edit kernel level parameters via sysctl interface.
The kernel parameters that enable ipv6 are as follows

$ sysctl net.ipv6.conf.all.disable_ipv6
net.ipv6.conf.all.disable_ipv6 = 0
$ sysctl net.ipv6.conf.default.disable_ipv6
net.ipv6.conf.default.disable_ipv6 = 0
$ sysctl net.ipv6.conf.lo.disable_ipv6
net.ipv6.conf.lo.disable_ipv6 = 0

Note that the variables control “disabling” of ipv6. So setting them to 1 would disable ipv6
Edit the file – /etc/sysctl.conf

$ sudo gedit /etc/sysctl.conf

And fill in the following lines at the end of that file

# IPv6 disabled
net.ipv6.conf.all.disable_ipv6 = 1
net.ipv6.conf.default.disable_ipv6 = 1
net.ipv6.conf.lo.disable_ipv6 = 1

Save the file and close it. Restart sysctl with

$ sudo sysctl -p

Check the output of ifconfig again and there should be no ipv6 address

$ ifconfig
eth0      Link encap:Ethernet  HWaddr 08:00:27:5f:28:8b  
          inet addr:192.168.1.3  Bcast:192.168.1.255  Mask:255.255.255.0
          UP BROADCAST RUNNING MULTICAST  MTU:1500  Metric:1
          RX packets:1346 errors:0 dropped:0 overruns:0 frame:0
          TX packets:965 errors:0 dropped:0 overruns:0 carrier:0
.....

If it does not work, then try rebooting the system and check ifconfig again.

Method 2 : Disable ipv6 from GRUB

Ipv6 can also be disabled by editing the grub configuration file

$ sudo gedit /etc/default/grub

Look for the line containing “GRUB_CMDLINE_LINUX” and edit it as follows

GRUB_CMDLINE_LINUX="ipv6.disable=1"

The same can also be added to the value of the variable named “GRUB_CMDLINE_LINUX_DEFAULT” and either would work. Save the file, close it and regenerate the grub configuration

$ sudo update-grub2

Reboot. Now ipv6 should be disabled.

porplague70

Limitação de banda (Upload e Download) no pfSense

Gerenciar sua largura de banda

pfSense é de longe uma das melhores soluções de Gateway, na minha opinião. Neste tutorial você vai ver um recurso muito interessante que faz do pfSense um produto de alto nível, que é o limitador de largura de banda.

Em primeiro lugar vamos fazer um teste de largura de banda para verificar o que estamos recebendo. Eu tenho um serviço de internet a cabo da NetVirtua de 50Mb de Download e 5 Mb de Upload.

A imagem fala por si, estou recebendo 50/5. Agora vamos começar com as nossas limitações, vamos precisar criar um limitador de download e upload para depois aplicar em cada rede local, em seguida será necessário criar uma regra no firewall.

Vamos começar:

Primeiro precisamos encontrar a aba de limitador no pfSense. Este está localizado na guia Firewall -> Traffic Shaper, a terceira aba é o limitador.

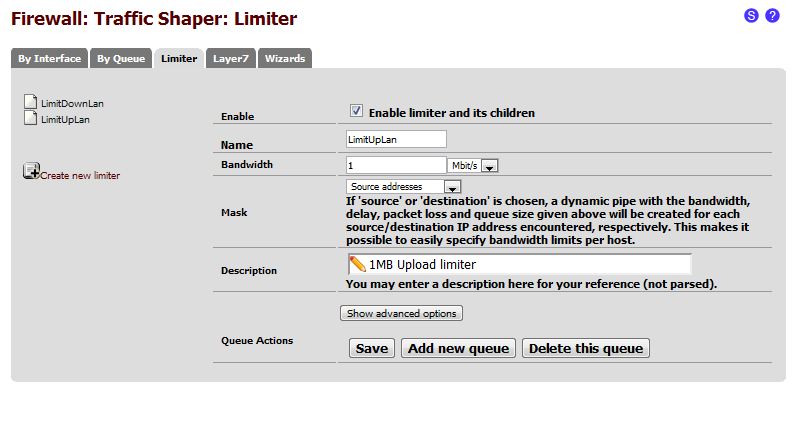
Em seguida vamos para selecionar Create new limiter, Vamos chamá-loLimitUPLan.

  1. Clique em Enable
  2. Defina o nome para LimitUpLan
  3. Definir largura de banda permitida (Bandwidth allowed  (1mb))
  4. Mask Source Address
  5. Dê uma descrição
  6. Salvar

Agora vamos criar um outro limitador, Vamos chamá-lo LimitDownLAN

  1. Clique em Enable
  2. Defina o nome para LimitDownLan
  3. Definir largura de banda permitida (Bandwidth allowed (3Mb))
  4. Mask Source Addresses
  5. Adicionar descrição
  6. Salvar

Agora devemos ter dois limitadores disponíveis para ativar nas regras de firewall. Durante a montagem dos limitadores, configuramos o mascaramento do endereço de origem. Isto diz ao pfSense que ele deve criar uma fila única para cada endereço de origem do lado da LAN. Se deixássemos de marcar esta opção, então teríamos apenas uma fila limitada a 3Mb para todos os usuários da LAN assumindo assim que os 50Mb, deveria torna-se 3Mb. Isso não é o que queremos, queremos limitar cada usuário a 3Mb, para que ninguém possa abusar de toda a banda de 50Mb exclusivamente. Nós poderíamos ter 10 usuários todos com 3Mb streaming cada um, com um total de 30 Mb de Download por segundo e ainda teríamos 20Mb disponíveis.

Agora vamos começar a aplicar as regras em nossa LAN.

Precisamos fazer com que esta regra seja executada antes de outras regras de permissão TCP e / ou UDP. Se colocá-lo abaixo uma regra de permissão, em seguida, essa regra terá precedência sobre a regra aplicam os limites. Neste exemplo eu coloquei a regra como regra # 2 acima da regra que permite que todo o meu tráfego para acesso externo.
Vamos adicionar uma nova regra:

  1. Action Pass
  2. Interface LAN
  3. Protocolo Any
  4. Source LAN Subnet
  5. Destination Any
  6. Descrição

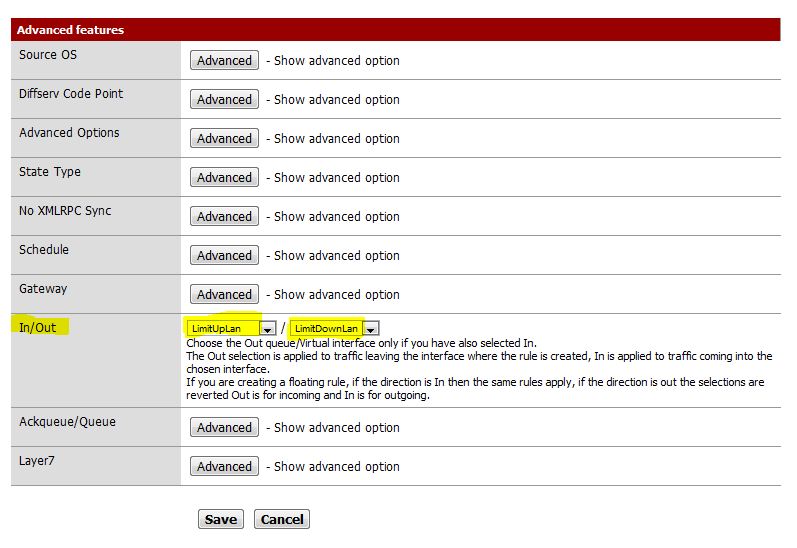
Agora edite a seção avançada: 

Clique no botão Advanced do recurso In / Out,  e selecione as duas filas criadas (In = Uploads) e (Out = Download). Salve e aplique a regra, depois execute o teste de uso da banda novamente.

Bandwidth Agora Limitada 

Este é todo o processo, do início ao fim. Neste ponto, você deve ter um limite de taxa de 3MB (download) e 1MB (upload) por utilizador da LAN.

Vamos limitar alguém hoje?

porplague70

liberar sped fiscal firewall proxy.

você so precisa liberar os host e ips abaixo para passar no firewall com acesso total.

sped.fazenda.gov.br
200.198.239.22
200.198.232.62
200.149.239.154
fazenda.gov.br
receita.fazenda.gov.br
br.gov.serpro
br.gov.serpro.spedfiscalserver
serpro.gov.br
200.198.239.21

porplague70

Xeams: Sistema de anti-spam OpenSource.

Xeams For Linux


Installation Instructions

Follow the steps below to install Xeams on a Linux machine.

  • Log in as root
  • Download the installer
  • Extract the tar file using the following command
    tar -xf XeamsLinux.tar
  • Ensure the permissions for Install.sh is set as an executable. If not, use the chmod +x Install.sh command to change its permission
  • Execute Install.sh script
  • By default, the installation script will install the server in /opt folder. You can change this location to any other value if desired. Additionally, it will create necessary scripts in /etc/init.d/ folder so that the server comes up when you restart the machine.
  • Using your browser connect to http://localhost:5272
porplague70

Comunidade Brasileira Pfsense

http://www.pfsense-br.org/

porplague70

Problema squid Pfsense 2.3

A atualização do Pfsense 2.3 esta trazendo uma dor de cabeça ao pessoal de TI.

ele não atualiza o squid  e não reinstala.

solução:

entre em linha de comando e remova o diretório.

/usr/local/etc/squid

abra Pfsense via web e reinstale o pacote.